
TOOL BAR
PHOTOSHOP - The Tool Bar


THE TOOL BAR
All of these tools are simply activated by a click, or by using their short cuts. The Tool bar does change from version to version in its appearance, but the functions stay pretty much the same.
• If you HOVER your cursor over a toolbar item, a fly out shows you its function
• RIGHT CLICKING will give you other tools grouped there.
• The two small triangles at top right of the tool bar allow you to change from one column to two.
SELECTION TOOLS INC SHORTCUTS (from L to R, top to bottom)
1. (V) Move Tool - to move a layer or part of an image
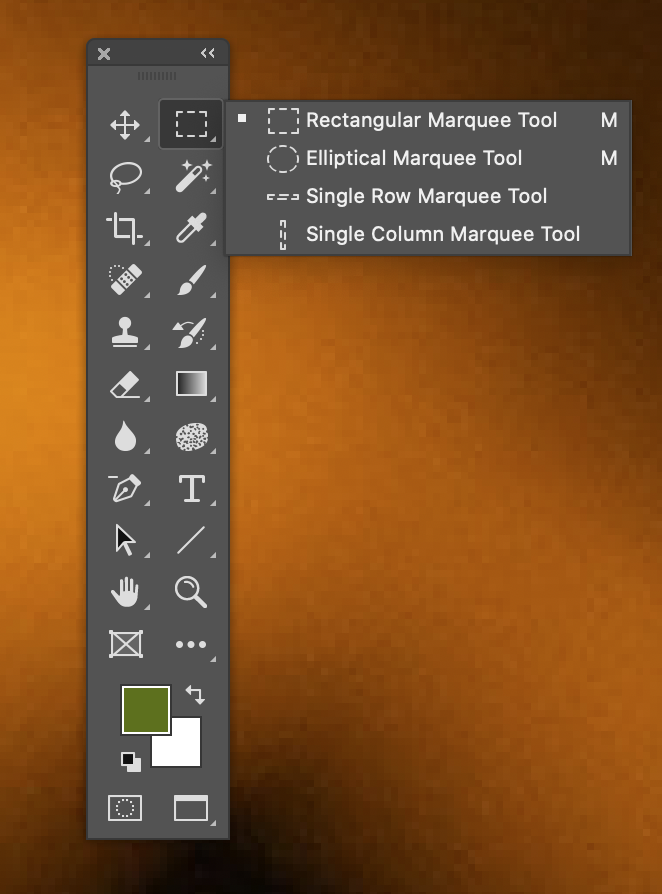
2. (M) Marquee / Eliptical/Row to select an area
3. (L) Lasso tools / Magnetic / Polygonal selection
4. (W) Magic Wand and the Quick Selection Tool
5. (C) Crop Tool / Slice Tools / Perspective Crop Tool.
VISUAL EDITING TOOLS
6. (I) Eyedropper tool / Measure.
7. (J) Patch / Healing / Spot healing / Red Eye tool / Content Aware Move Tool.
8. (B) Brush tool / Pencil/Colour replacement tool / /Mixer Brush Tool.
9. (S) Clone / Pattern stamp tool.
10. (Y) History / Art History Brush.
11. (E) Eraser / Background / Magic eraser.
12. (G) Gradient tool/Paint Bucket / 3D Material Drop Tool.
13. (R) Blur, Sharpen & Smudge.
14. (O) Dodge, Burn & Sponge tools
15. (P) Pen tool to trace or create a path
16. (T) Text tool to create live text
17. (A) Path Selection tool
18. (U) Rectangle / Line/Polygon tools / Custom Shape Tool.
19. (H) Hand Tool / Rotate View Tool.
20. (Z) Zoom tool/Magnifying glass
21. (K) Frame Tool
22. (W) Edit tool bar / Curvature Pen Tool / Object Selection Tool
(D) COLOUR SWATCHES (foreground and background colours)
23. (Q) Edit in Quick Mask mode
24. (F) Change Screen Mode.
1. The MOVE TOOL (V) is used to move any part of an image, in fact information in a layer can only be moved by this tool.
2. The MARQUEE TOOL (M) (Rectangular, Elliptical) is used to select an area of an image as a rectangle, circle or ellipse only, You drag with your mouse and draw a selection. You can then either cut this out from the original image, or copy and paste it as a separate layer.
3. The LASSO TOOL (L) again is a selection tool, but here you can draw it freehand to circle or surround an item in an image. You can constrain the tool to also give you straight lines.
4. MAGIC WAND (W). This is yet another selection tool, but it is used to select pixels of similar colouring or density. You can adjust the amount of pixels selected by adjusting its Tolerance.
5. The CROP TOOL (C) does just that, it allows you to frame and crop to the size or proportions of your final presented work, or rotate it. This also houses The SLICE TOOL for cutting up website designs into bite-sized chunks. (Not really needed here). Plus the PERSPECTIVE CROP TOOL.
6. There are some really cool tools nestled here; The PATCH / HEALING / SPOT HEALING / RED EYE (J).
These are all used to help remove zits, spots, marks, powerlines, in fact anything that is in your image that you need removing, one of these tools can do it. But, they work when the offending object does not have highlight and shadow, it needs to be in its own contiguous space. The idea is that you circle or select the object and it is replaced by nearby pixels of a similar colour.
8. PAINT BRUSH / PENCIL TOOLS (B). These are just that, great for painting, where you need to use areas of flat colour. You can adjust the diameter of the tools, plus change the colour, or the type of brushes from normal circular to patterend. You can vary the ‘hardness’ or ‘softness’ of your brushes.
9. The CLONE STAMP TOOL / PATTERN STAMP TOOL (S – Right click tool to see both tools). Here’s where the fun starts! This tool is great for copying elements within an image, or another image. It paints exactly what it copies from. You can clone from one layer and ad it to another then enlarge or reduce it. You can change its ‘opacity’ or pressure, so that it is but a faint representation.
‘This is a tricky tool to use at first but once mastered it is very cool!
Keeping your finger on the Control key, you put your cursor over the ship in the image above, then click once with your mouse. This sets the ‘source point’. Take both hands off and move the mouse to just below the ship in an area of clean ocean. Now click and hold down your mouse and start ‘painting’. The tool will ‘clone’ the ship and reproduce it.’
The Pattern Stamp Tool clones from a preset pattern.
10. HISTORY / ART HISTORY BRUSH (Y – Right click tool to see both tools). This tool lets you paint, on an image that you have worked on or edited, back to its original opened state. You can do this over the entire image, or parts of it. This only works as long as the image size has not changed since opened.
11. THE ERASER / BACKGROUND ERASER TOOLS (E – Right click tool to see both tools). These are simply ‘rubbers’ and they erase anything on a layer, but not from an unlocked image. Here you will need the ‘Background Eraser’.
The Eraser is used for rubbing out pixels/information on a layer and is a great tool for this purpose.
12. GRADIENT TOOL / PAINT BUCKET (G – Right click tool to see both tools). The Gradient Tool produces a seamless gradient between any two chosen colours from the tool bar. Simply click a colour swatch to bring up the ‘Colour Picker’ then chose a colour. Click the ’Background’ swatch to do exactly the same. Drag the Gradient Tool from top to bottom or vice versa, or from edge to edge and it simply creates a gradient.
13. BLUR / SHARPEN / SMUDGE TOOLS (R – Right click tool to see all three tools). The Blur tool is great for blurring the edge of a layer to make it look more realistic, or areas within any image. It softens the edge transition so that it blends better with a layer beneath it. The Sharpen Tool does just the opposite, though this tool is to be used carefully as the results do tend to look rather messy if used too much. The Smudge Tool again blurs through smudging, the results look a bit like paint being smudged.
14. DODGE, BURN & SPONGE TOOLS (O – Right click tool to see all three tools). These are tools from the photographic darkroom days. Dogde lightens areas of your image, Burn will darken the same area, whilst Sponge has two states; Saturate or Desaturate.
16. THE TEXT TOOL (T – Right click tool to see all tools). This is a great tool to create any form of live edited text. It is similar to using Microsoft Word in that you can select all, copy, paste, change fonts, font size, in fact any aspect of your text.
20. THE EYEDROPPER TOOL. This lets you select any colour on your workspace simply by clicking a colour. It then changes the tool bar swatch to that colour.
22. ZOOM TOOL (Z ). Another way of magnifying or reducing the size of your image on screen. It has two states + or -, by changing this state then clicking, your image gets smaller or larger. If you drag a selection with the Zoom Tool and let go, it fills the screen with just this area.
23. FOREGROUND & BACKGROUND COLOURS (X) Here by clicking X, you can switch between the two tool bar colours no matter what they are. Press the D key to default these colours to black.
All Tool titles © Adobe Systems 2021. All photography and descriptive information Jon Davison 2021